
Darlings! I haven't had a moment to breathe sew much for myself since I last updated, but I figured I could at least share some lil' techniques I've been learning "on the job." In my freelance work, I often sew multiples of the same thing, so I use those opportunities to try out different ways of executing the same step to see which method is fastest or looks the best.
Gathering fabric is one of those [obnoxious] tasks that can be done a few different ways, such as pulling on two parallel lines of basting stitches, zig-zagging over a strand of dental floss or string, or using a gathering or ruffle foot on your machine. Those all work fine... when they work. I actually haaaaate gathering fabric because those methods very easily go wrong and can be time-consuming, especially when your threads snap and you have to start all over again. And what if you need really dense gathers, or your fabric is a bit thick? A gathering foot won't do you much good there.
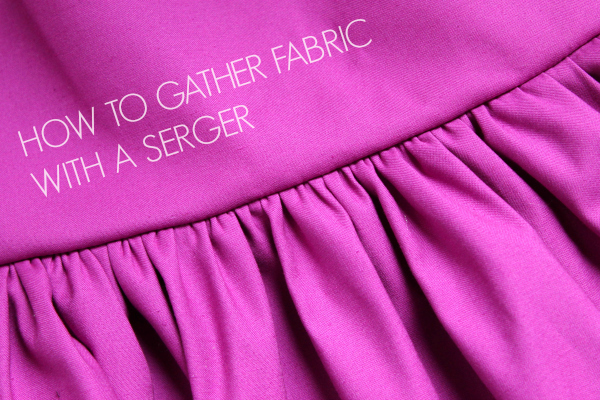
Well, I was recently commissioned to make 10 gathered party skirts for a local startup clothing line, so I had to figure out a way to get fast and consistent results with sewing gathers. OR ELSE. The fabrics I'm working with for these skirts are cotton sateen and silk taffeta, and they have a skirt-to-waistband gather ratio of 2.75-to-1, so they're pretty frickin' poofy and need a lot of gusto to gather. I think 3-to-1 is the determined max limit on gathered skirt poof before it becomes, like, physically impossible to sew and maybe socially unacceptable to wear.
I knew in the back of my mind that sergers could gather fabric, but I had never tried it. So when I did try it, I couldn't believe how much easier and faster it seemed. All you have to do is adjust some settings on your serger and get gathering. Now, of course this method can go wrong, too, as nothing in sewing is fool-proof, right? This technique actually works in an opposite manner as the basting method because you gather the fabric as you serge and then loosen the gathers to fit. This is unlike the basting method, in which you typically tighten the gathers to fit. This means you should test out your gathers on scrap fabric first to make sure it gathers tightly enough on your serger. If the gathers are too loose after serging, it will be difficult to tighten them up.
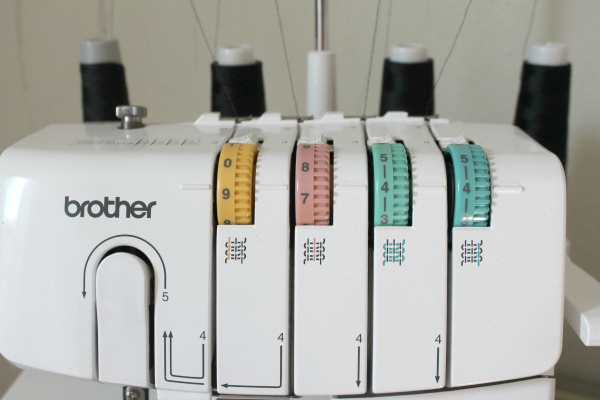
The first step is to set up your serger for four-thread overlock. The tightest gathers will occur if there are two needles engaged instead of one. Once you have threaded your serger properly, tighten the tension of the two needles (not the loopers), which are typically the two leftmost dials. For this particular project, I needed to gather the fabric very tightly, so I increased the needle tension as high as it would go, which on my Brother 1034D serger is at a "9" tension. After some trials, I found I achieved best results if my left needle is at "9" and the right needle is more like a "7" tension. Your machine may react differently. I left the loopers at default tension, which for my machine is a "4":
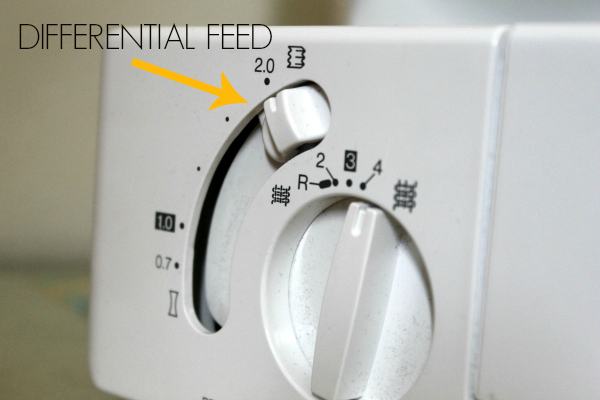
Next, tighten the differential feed if you are able to. The serger has two sets of feed dogs, one in front of the other, and the differential feed controls the ratio at which these feed dogs move the fabric under the presser foot. A higher differential feed -- in this case, a "2" -- will move the first set of feed dogs twice as fast as the second set, which gathers up the fabric. Conversely, a lower differential will move the first set of feed dogs more slowly, which stretches out the fabric. Here I've set it to the highest ratio possible:
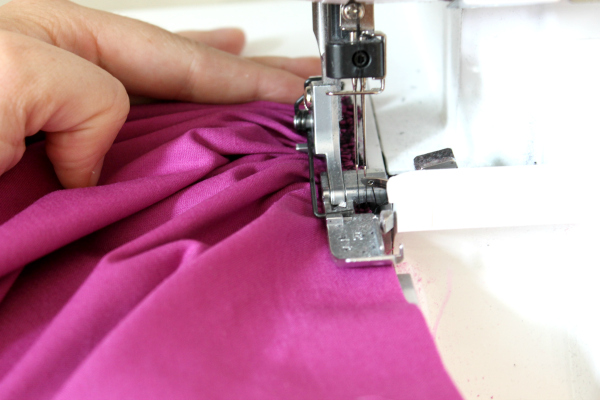
Now, all you have to do is serge along the edge of the fabric and the machine will do the gathering work for you.
Here is a video I took of the gathering at work. This is high production value, folks. Oh you're welcome!
Keep in mind that the serger will gather along the edge, so you may need the adjust your seam allowance first or serge so the blade cuts off part of the seam allowance if it is 1/2" or larger. Make sure the left needle of your serged seam does not extend past your desired seam allowance because the threads will then be exposed on your garment and they're hard to pick out neatly. It may help to match your serger thread color to your garment, but I did not do that here (the skirt is lined and I did not want to spend money on four fuschia cones for one project!).

If you are attaching the gathers to a flat piece of fabric, it helps to have marked the gathered fabric and the flat fabric into fourths so it's easier to match up the points and distribute the gathers evenly. Below, I have matched the quarter marks and then I gently loosened and distributed the gathers so they match the length of the flat fabric. If you yank on the serging too hard to loosen it, the threads may snap, so be currful. Lots of pins help secure the gathers.


When you sew the gathers to the flat fabric on your sewing machine, it helps to have the gathered side facing up so you can make sure the gathers aren't folding over or jutting out from the seam allowance. Be sure your needle sews right below the serged seam.
Donezo.

It's worth mentioning that you can do something similar with a regular sewing machine by upping the tension, but the serger helps create tighter, more even gathers because it is set up to sew two parallel lines of stitching with two needles and you can adjust the differential feed as well. I also like that it finishes the edge as you gather so there's less annoying fray to deal with when you're attaching it to the flat fabric. And because it's so fast, if your gathers somehow fall out or get too loose, you can just zip over one section again with the serger. Much less stress than having to rebaste two full lines.
How do you prefer to gather fabric?