Sunday, December 29, 2013

ted d. bear


This year I almost didn't bother to make any gifts for Christmas. It's too stressful and time-consuming, right? But, if you think about it, handmade gifts are totally forgiving. Even if the receiver isn't smitten with the item itself, or it's something they would never think to get for themselves, they tend to be more likely to appreciate the gesture even moreso because it's handmade. For example, you can just buy an ole teddy bear anywhere, so it's not that interesting of a gift on its own. They sell teddy bears in airports, hotel gift shops, Amazon, in line at the CVS Pharmacy, Wal-Mart, Goodwill (#bedbugs), and even at the fabric/craft store. There is no shortage of teddies in any shape, size, or color. But a HANDMADE teddy bear? Oh c'mon now, that's special. ...Right?


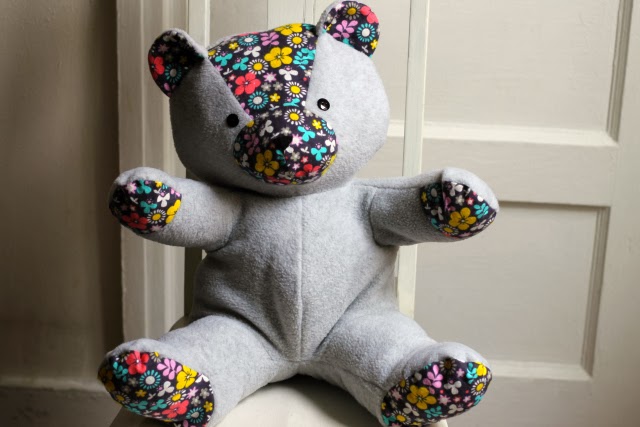
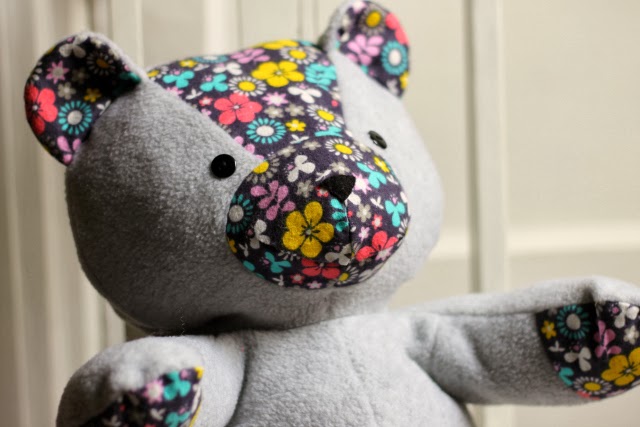
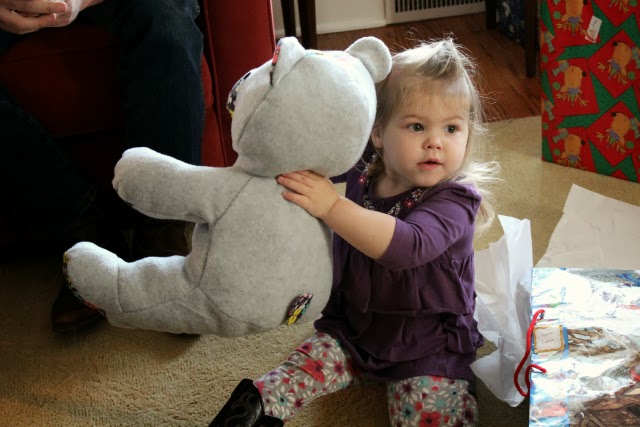
I made this particular bear for my two-year-old niece for Christmas. I know a two-year-old doesn't care whether something is handmade or not, but her parents know and hopefully they'll tell her about it one day. I've mostly made clothes for her in the past (see the robe, dress/cardigan, and jacket), but making garments for an ever-growing child who is disinterested in clothes feels like too much of a risk. I decided this year that I should still make her something, but something that she can love for longer. I saw the bear that Lisa G made for her daughter recently, and decided to try that same How Joyful bear pattern and tutorial because they were free (here), and the finished product looked cute instead of creepy. It's 16 inches tall, sits up on its own, and is readily posed for a big hug. I followed Lisa's lead and made it a showcase for a cute fabric print.


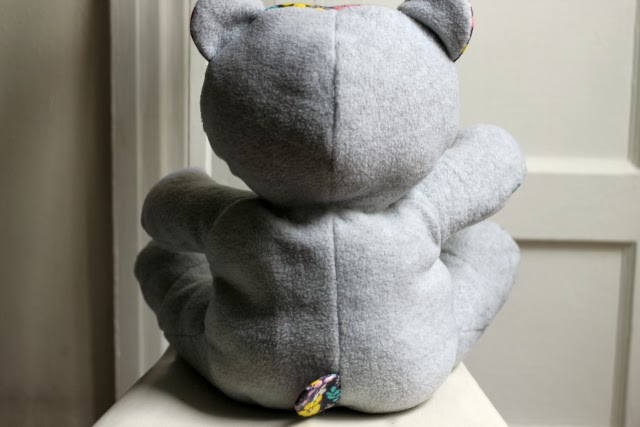
The How Joyful Bear tutorial seems to be a popular post, but I could only find a handful of other people online who posted about their finished bears. The consensus seems to be that it's a difficult tutorial to follow. I agree that it's not explained very thoroughly, and it lacks photos of steps that could really use accompanying photos, like where the seams of the feet pieces should meet and how. However, the pattern pieces are labeled with letters on each corner so you know how they should line up with other pieces, which certainly helps because the bear's shape was not intuitive for me to figure out the construction order on my own. I wouldn't say it was difficult to make this bear, because it can be completed in one evening even with unpicking and some frustration about seams not matching up. It's just different than what I'm used to since it's a more complex curved 3-D shape than your typical knit dress.

I actually sewed this bear up once before this one, but the fabric I chose (some bathrobe-type material) shed like crazy, even after it had been sewn up, which made it very impractical for dragging around the house. Here's what I was dealing with:


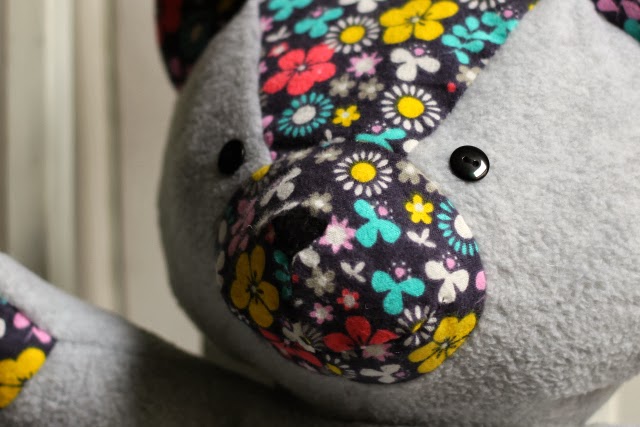
Plus the first bear just turned out ugly. My second time around, I used better fabric, colors and accessories, and smoothed out some of the curves of the bear's head and belly so he wouldn't end up as grotesquely fat as my first one did. For this guy, I used light grey anti-pill fleece for the bear body and navy floral flannel for the contrast pieces. I didn't want to use a set of "animal eyes" because they kinda gross me out (don't ask), so I just sewed on black plastic buttons. I first tried fabric-covered shank buttons, but the fabric attracted lint and the buttons flopped around making the bear's face look insane. He's much more charming with these eyes, and I think I like that it gives off a hint that the bear is handmade instead of storebought. I cut the nose from felt and hand-stitched it on. The whole thing is stuffed with polyfill bought in a bag from JoAnn's.


I took a few photos of my niece opening the bear on Christmas morning. I think she said "Wow" and then kissed it (on our command), but since it's just a stuffed bear, it doesn't really provide endless opportunities for entertainment for a small child. I just hope she'll hang onto it for awhile and grow to love what Aunt Andrea made for her. Teddies are timeless! And this one has flowers on its face!


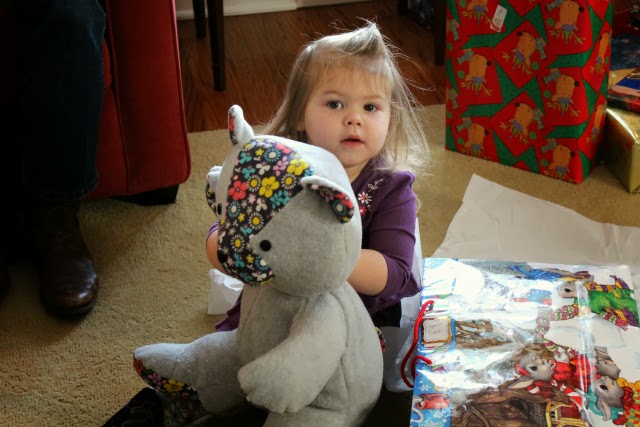
And yes, she and her daddy (in the background) were both wearing cowboy boots. Did you forget I'm from Kentucky?

I hope you all had a wonderful holiday. Did you, too, make something fleecey for a special niecey?

Monday, December 16, 2013

archer appreciation pt. 5

I made this Archer before I even knew December was Archer Appreciation Month. Yeah, I've been that behind on blog reading and that sugar-high on pumpkin pie lately. But since I pull out this pattern every month or two when I realize I have hardly anything else to wear on Casual Friday, the chances were good that I would accidentally stumble my way into this bloggy sew-along led by power duo Rochelle and Erin.


This is my fifth time making the Archer shirt by Grainline Studio. If you know me in real life, you've most certainly seen me wear this stripey version. A lot. It's my favorite so far, because the fabric is made from rayon, which I lurv. I think this pattern is well-suited for crisp shirting fabrics like cotton (see Amy's), linen (see Lori's) and flannel (see Lauren's), but also works in more fluid fabrics like rayon, chiffon or silk (see Jen's, Lizzy's, or Stevie's). It means my collar stand doesn't actually stand up and the collar won't roll to save its life, but the general style of this pattern is pretty relaxed anyway so I'm fine with the pancake collar.


Sewing a button-down shirt with vertical stripes makes it laughably easy to neatly cut and sew those button plackets and line up buttonholes. Okay, maybe not laughably easy. The only time I "laugh" when making buttonholes is in maniacal rage after ripping them out for the thousandth time. But as I recall, I had no such issue with this shirt. 


I changed nothing about the pattern except lengthening it to cover my bum and omitting the cuffs because I always wear my sleeves rolled up. Always! From the looks of it, I should have added another button on the bottom, but, uh, I've gained some weight recently (see: pumpkin pie) so I don't think the shirt would close at my hips anyway. Ouch, that hurts to admit. 

I haven't really seen too many striped Archers around, so I'm glad I'm contributing unique content to the world even though I feel like I'm constantly blogging about this pattern. I love playing with stripes but didn't want to make it too dizzying in this case, so I only added one feature with horizontal stripes. I guess it's effective because people are always like, "I like your pocket" and I'm like, "Aw shucks."


There's not much left to say that hasn't already been said about this pattern. If you still haven't made an Archer shirt for yourself, December is the time to do it... when you're not too busy sitting in traffic in the mall parking lot or whatever. ~ 'TiS tHe SeAsOn ~ 

Jen, Grainline Studio's fearless head honcho, did a full sew-along for this shirt awhile ago, so check out those posts (in reverse order) here. And if you want to get neater results on your collar stand, check out my own tutorial about that here. I've loved hearing success stories from those who tried it out! 


Read more about #archerappreciation here or here.

In knitting news, I've finished a hat (that I've already lost, dear god), cowl and sweater since I took my beginner knitting class. If you live in Philadelphia and are interested in learning the basics and more, I'd definitely recommend the beginner knitting class at Rosie's Yarn Cellar in center city. It's a six week class and we learned how to cast on, knit, purl, increase, decrease, knit in the round, use double-pointed needles, cable, read patterns and charts, bind off, and -- most importantly -- fix most of our mistakes. We got to use the beautiful yarns in their shop to work on a ribbed hat and cabled fingerless mitts. I do feel like I can tackle a lot of patterns out there now.


The pattern above is Lara's Cowl in bulky Lion Brand Wool Ease yarn (from Joann's, not Rosie's, gah). Quick, easy and warm. I wear this cowl every.damn.day because the color complements my plum coat as well as my navy Minoru jacket.


Duh, this is the Owls Sweater by Kate Davies. I've finished it since I took this photo but I honestly don't really like it because of the high crew neck, bulky shoulders and the super fuzzy roving yarn I chose. And after blocking the sweater, the yarn now seriously smells like a sheep's ass. So, it makes me look like an adorable owl-clad linebacker who smells like I slept in a barn all night. Such a bummer.

How's your December making going?


Wednesday, November 27, 2013

holiday party dress

Wow, I have seriously neglected my blog lately. I last updated on Halloween and now it's nearly Thanksgiving. I bet you guys have been able to get by just fine without me. I miss you, though, friends of the webz. Work stress has been taken out on my knitting needles, where I'm still fumbling along like a noob and can barely complete anything.

Despite my poor blogging etiquette, I was lucky enough to be asked by Suzannah of Adventures in Dressmaking to take part in her 7 Days of Holiday Party Dresses series. Seven different bloggers and seven different holiday dresses have been featured over the past two weeks. Today you'll find me over there, wearing a new dress. That I sewed! Yes, I still sew.


Head over there now to read about this dress and all my usual blabber. Have any of you planned to sew a holiday party dress this year?

Thursday, October 31, 2013

fear fabric: a lacy affair

Since it's Halloween and all, let's talk about our deepest fears. I have a few weird fears: Furbies most of all -- those awful talking, blinking, "sleeping" toys with the beaks and moving ears. Talking dolls or toys in general, especially broken ones that start chanting at you in the middle of the night (yes, that's happened to me). Ferris wheels, which I guess goes in line with my general fear of heights. Mean clowns, sure. Mean clowns hiding in the shower. Ghosts. Mean clown ghosts hiding in the shower. Lace.


Wait. Lace? Okay, we've moved into a different category of fear. As in, the fear of challenging your skill set, venturing into the unknown, and potentially failing at a sewing project due to lack of experience. THAT is actually what this blog post is about. Sorry we have to move away from the clown ghosts.

In the spirit of the spooky holiday, Beth of 110 Creations challenged a few of us bloggers to tackle one type of fabric we've been "afraid" to sew with. Enter the Fear Fabric Challenge. Because of my scaredy cat nature, I'm too nervous to sew with a lot of types of fabric, like silk chiffon, leather, suede, sequins. Lace has always been on that list, too. How do you sew through holes? How do you finish the edges? How to you hem it? How do you wash and care for it? Will it end up looking like a costume for a zombie bride?


Guys! Guess what! It's not hard. The hardest part about sewing with lace is finding acceptable lace to sew with in the first place. It can get very bridal or very tacky trashy very fast. The local options were both the latter and the former, and I found it difficult to shop online looking at 2D photos of textured fabric. Not to mention that almost all laces are floral patterns, and I feel a little uncomfortable wearing something so incredibly feminine. I'm not the neighborhood tomboy but I'm no Grace Kelly either.

I decided to look specifically for crocheted lace in an off-white color, because it has a bit of an earthy feel to it -- instead of pure bridal delicacy. I actually found this crocheted lace on Fabric.com. It's a stretch lace (find it here), which I dug because that meant I wouldn't have to sew darts or do much fitting with this "scary" new-to-me fabric. I love the pattern of this lace -- almost like seashells.


I underlined the front and back with hatchi jersey knit in ivory, also from Fabric.com. I treated these layers as one when attaching the neckband and sleeves as usual. This made it easier to sew because the jersey helped fill in the holes of the lace.


The pattern is the Kitchsy Coo Lady Skater Dress, with the bodice lengthened to a tuckable top length. Obviously I left off the skirt. I considered making a full dress in this fabric but wanted to avoid the taboos of wearing all white after Labor Day, or wearing a white lace dress when I wasn't on the altar. I was also afraid if I made this fabric into a full outfit, it would be more likely to snag on things. I'm glad I made this choice because I can wear the top with neutral skirts to work, or wear it with fancier skirts for fancier shindigs, or wear it with shorter skirts for weekend fun times. I've already worn it three times since I made it this past Saturday, heh.


Sewing with stretch lace is very similar to sewing with any stretch fabric. I referenced this blog post by Sew Fearless about it just to make sure I was on the right track. Appropriate that her blog name is Sew Fearless for my Fear Fabric challenge, yea? Tips include using a stretch needle, zig zag stitch or serger, and Wonder Tape to help stabilize and fill in the fabric for hemming. Stabilize your shoulder seams, too, if you're proper (I am not). 


My fabric is polyester. !! I was in NYC for a hot minute a couple weeks ago and breezed by the lace section at Mood, where silk lace runs at ~$40/yard. Sorry Charlie, je suis pauvre. 

I feel like maybe I phoned it in on this challenge because I essentially just made a t-shirt. I don't think my lace-sewing skills will ever be on par with, say, Julia Bobbin's (see here, here, here, oh and here for evidence), but I don't think my sewing skills or my style in GENERAL will ever be on par with her's. And I'm okay with that! I love my little poly top that cost me like $13 and 2 hours, and I still feel accomplished for finally sewing with a new fabric. You go girl.


P.S. My skirt is not handmade. It's from Banana Republic - bought secondhand last year before the anti-shopping habit kicked in.

Be sure to check out how these other sassy gals tackled their fears. Participants in the Fear Fabric challenge include:


Who else is scared of sewing lace? Or, who else is scared of Furbies? C'mon, I need to know I'm not alone on that one.

Sunday, October 27, 2013

concerto


I'm on a downward spiral into the dark abyss of craft addiction. Soon I'm going to wake up, gasping for air amongst a pile of mod-podged bird houses and baby flower headbands with an overdrawn bank account and no memory of the preceding week.

It all started by sewing practical household stuff like pillows and curtains. Then I launched into making my own clothes (as you know), which has been fulfilling and challenging, so I was content with investing my time in that alone for a couple years. But then I got it in my brain recently that I should try making a quilt, just because. Then I decided I wanted to knit more stuff, too, so I signed up for knitting classes and am currently knitting my first hat with grand visions of cabled sweaters in my future. What I'm saying is that I WANT ALL THE HOBBIES. 


So here I present the quilty step of my creation obsession. I partially blame fellow blogger Ashley, who made some cool and simple chevron quilts recently (here and here) and sent me a link to Crafty Blossom's blog. Then Tasia of Sewaholic fame wrote an epic post about her first quilt, and she made it seem doable and fun. Then I started getting Pinteresty with quilt inspiration. Once that happens, you really can't stop me. I purchased a quilt pattern that night and planned my trip to JoAnn for the next day.


I wanted a simple quilt with geometric shapes and solid colors, so I was immediately drawn to the Concerto pattern by Aria Lane, pictured above on the left. The asymmetry is modern and interesting and you can combine bright or neutral colors. For the fabric I went with the recommended Kona cotton solids by Robert Kaufman. I didn't want to risk buying cheaper fabric in case it were terribly off-grain or too loosely-woven to make a nice quilt. It felt strange to be on the other side of the fabric store than usual. The double knits and flannel shirtings were whispering harsh words about me behind my back. It took all the self control I had to resist shutting them up by buying them all.

The pattern suggested a couple different color schemes, and this one happened to match our living room decor (and my blog) pretty well so it seemed meant to be. In the Kona colors, I chose White, Navy, Curry and Ash to make the throw-size version (64" x 78"). The pattern gives you instructions for making a wall, crib, throw, twin, queen or king size quilt. I'm having heart palpitations just thinking of the time, space and insanity needed to make a king size quilt.


Making a quilt -- or this type of quilt -- didn't require learning a whole host of new construction techniques for me as an apparel sewer. Since I already own a rotary cutter and walking foot, the only new "tools" I invested in were some rulers to help the cutting process: a 6" x 6" clear one and a long 2.5"-wide one for the binding. This pattern is just a bunch of squares and half-squares (i.e. isosceles triangles) and I chose to do straight line quilting, so I didn't encounter anything technically difficult. I still was expecting the pattern to include some tips about quilting techniques in general, but it didn't really. It tells you what to cut and when to do things, but it doesn't specifically tell you how. I consulted blogs for more info about how to baste and bind a quilt.

What was newest for me was how every step of the creation process takes SO.LONG. When you cut, you cut forever. When you stitch the squares and then stitch the rows, you stitch forever. When you sew the binding to the edges, you press and turn and stitch forever. With apparel sewing, the longest you're at your machine for one sit-down is, what, 10 minutes?, before you need to press something or pin another seam or unpick your horrible buttonholes. With quilting, you can be at your machine for one sit-down for DECADES. And your back muscles groan at the struggle, and your bones begin to creak and your hunchback sprouts. It doesn't help that I decided to baste, quilt and bind the whole thing in one Saturday. On Sunday I learned that it's possible to wake up sore from sewing.


I also had to adjust to the awkwardness of shoving a huge beast of triple-layered fabric through my sewing machine. When you're in the middle of sewing a rectangle that is taller than you are, and have no edges to hold onto, sewing even stitches becomes difficult. I started out using my edge-stitching foot, but my stitches were so uneven and strained due to my inability to hold and guide the fabric properly, and my machine's feed dogs struggled to pick up the slack. I switched to my walking foot and found a way to roll the sides of the quilt into burritos so I could grip them to steer (like you see in Step 5 here, but without the clips). This helped with the quilting, and then from there I just had to emotionally adjust to the boredom of sewing rows of stitches for what felt like the rest of my life. I can't imagine if I actually followed the pattern's suggestion for quilting with a "very dense organic crosshatch." While it looks pretty cool, I'm not sure I nor my machine could handle it. I also did not want to have to burn through 5 spools of thread and 18 bobbins or whatever in order to make it work. Yea, making a quilt takes a LOT of thread.


I unfortunately don't have a bottomless wallet, so I cheated for the quilt backing. I bought a $4.99 twin-size gray sheet from a big box store, which is ironic considering I wanted a higher quality Kona cotton quilt top. Eep. The binding, too, is dark navy twill leftover from some unblogged Jedediah shorts I made Corey this summer. It doesn't perfectly match the navy squares in the quilt itself, but I was really avoiding having to buy any more yardage.


Despite my complaining, finishing my first quilt feels like a grand victory. I've already forgotten the tedium of it and want to start a new one all over again. This one has been well-loved and heavily used in the past week, so I'm glad I made it. It's the perfect size for one or two to snuggle. And I know I look sickeningly smug when I plop on the couch wearing a handmade outfit, wrapped in a handmade quilt, knitting a handmade hat. CRAFTY HIGHS. 


Do you ever cross over between sewing apparel and quilts? What do you like about one versus the other? And how many hobbies are too many?!

Sunday, October 20, 2013

o' henley


OK, more dudewear! I know you gals love it, right? Here are some handmade Henleys for the handsome him in my life. Apparently Henley (a collarless shirt with a short buttoned placket) is a capitalized word because it's named after the English town of Henley-on-Thames. Ralph Lauren was the one who said, "Let's take this weird long underwear top historically worn by rowers and make it popular for all men to wear in public" (not a direct quote) and it worked, because he's Ralph Lauren. Alright, enough history.


The pattern is the Strathcona Henley from Thread Theory, the new menswear pattern line based in Canada. You can see the shorts I made from their great Jedediah Pants pattern here. I bought the Strathcona PDF the second the pattern was released. Corey had been wearing these awful pilling Henley shirts from H&M that stretched out like crazy in the arms and were made from the blood and tears of children working in sweatshops overseas (I perhaps exaggerate). Our household has recently enacted an unofficial and unvoiced ban against H&M. I prefer to be the underpaid seamstress for all of our clothes, got it?


Corey is 6'1" and has a 30" chest. I made him the size XS with 1/2" seam allowances instead of 5/8", and it has a slim fit to his liking.


I don't really want to sugarcoat my whole review of this pattern, because I came across some issues with the construction and design that I changed in future versions for better results. HOWEVER, it's an excellent starting-off point and the fit is great, so I'm delighted with it anyway. My first try/muslin was a hot mess. The second one (the red one in the first photo) was better, but the fabric is a weird cotton/lycra blend from Girl Charlee that changes colors when ironed and gets fingerprint markings when handled. The third one is this heather gray version that is cozier fabric and is better made (but not stellar) in general.


So, in case you're interested in making this pattern, I want to go over some stuff that concerned me or that I changed. This post is pretty detailed about a men's pattern that a lot of you won't make, so I understand if it's not your thang.

1) Placket
The placket as written is supposed to turn out like this:


The placket is cut as one piece that is intricately folded so the inside ends up with tucked away raw edges. The bottom edge is folded and topstitched on the exterior of the garment. Red flag: disastrous sewing for Andrea ahead. Plackets are naughty by nature. Combine that with stretch fabric and an impatient seamstress and good luck.

After Googling the hell out of some plackets for Henleys and polos, I realized the ideal (for me) method was already under my nose: the Banksia Top pattern by Megan Nielsen! She includes two methods for the Banksia placket in the pattern instructions and on her sew-along. She calls this one the "easy" method, and I agree that it is easier, but I also prefer the way it looks because the bottom edge is tucked out of sight to the inside of the garment. 


To make the changes to the Strathcona pattern so I could follow Meg's example, I sewed the 1"-wide rectangle on the shirt first, so that when slit down the middle it creates two 1/2" seam allowances. Then I cut two separate placket pieces instead of one. I wanted a one-inch wide final placket, so each piece is 3 inches wide to start. It's interfaced, folded in half wrong sides together, and sewn at 1/2" to the front placket slits. I followed the rest of Megan's tutorial and called it a day. Just note that the Banksia has you finish the neckline before attaching the placket, but in this case for the Henley, the placket should be sewn before the neckband is attached. And of course, for menswear, the placket opens the opposite way (which it does in the Strathcona instructions but not in the photos that accompany the pattern).


I made my own my calculation error on this placket (sewing it at 5/8" seam allowance instead of 1/2"), which is why the left side looks a little too narrow and doesn't lay completely flat when worn. What I wrote out in the above paragraph will address this, though.

2) Neckband
The pattern piece and cutting layout tells you to cut the neckband along the lengthwise grain. Huh? On two-way stretch fabrics (jersey, double knit, interlock, ponte), the maximum stretch is on the cross-grain of the fabric. So... in this case, the neckband is NOT cut along the maximum stretch of the fabric, which doesn't make sense because the neckband absolutely needs to stretch to get over Corey's big fat head. It should be cut in the same direction of stretch as the body of the shirt is.


??

I tried it this way on the first Henley, and it was more difficult to stretch the neckband around the neckline of the shirt. The neckband is cut significantly smaller than the neckline -- which is appropriate for knit garments -- but without proper stretch in the neckband, it just doesn't really work. So, for future versions I cut mine along the cross-grain of the fabric instead.

If the neckband is cut on the lengthwise grain as instructed, then the neckband edges/corners are created by sewing vertically (along the crosswise grain), which means they groooowww as you sew, and you get ugly pointy neckband corners that are not squared off. This is hard to explain in written text, so I'm sorry if you have no idea what I'm trying to say. Let me know if you want more photos, because I plan to make this shirt again soon and can take construction shots.

3) Buttonholes
The pattern doesn't call for a button on the neckband, but it seemed too thick to not have one. I added one so it doesn't flop open and flash its serged seams. Risque.


My machine dislikes sewing buttonholes in general, but especially on this shirt, it was a nightmare trying to get the buttonhole foot to move at all on the finished placket/neckband. On my third version, I opted to sew the buttonholes on the placket and the neckband before attaching them each to the shirt. This made for neater buttonholes, yes, but it also meant I didn't get the final spacing very even. I didn't say anything about the button spacing to Corey and he didn't notice (or care), so we'll pretend it was intentional.

4) Cuffs and Hem Band
The sleeves on this shirt are meant to be long on a normal dude (versus long-armed Corey). The cuffs themselves are quite long. He requested that I lengthen the sleeve and shorten the cuff part a bit.


I omitted the hem band because the shirt would have been too long (in his opinion) with it, and I wasn't digging the style. I finished the hem with my coverstitch machine instead.


Besides the minor issues I had, it all sews up quickly and comfily. Snuggle up.


I hope I don't seem too nitpicky, because it truly is a great casual wardrobe staple for guys. Corey loves both of his. And Thread Theory includes very thorough instructions for sewing with knits - with or without a serger - that are geared toward beginners. If you're confident in your placket-making skillz, then this shirt can be made in a hot little minute. Or you can just make the t-shirt version!

If you've sewn a placket like this, do you have a preferred method?

Friday, October 11, 2013

second year

Hey, it's another blogoversary. Two big years! Toddlin' about. I did not make it an Oliver + S gift, though.

I know my posts are pretty few and far-between, but my blog is actually incredibly important to me. My readers are ace, and you all keep me motivated and inspired to keep sewing, learning and sharing. Friends & family have expressed admiration that I've found an activity I love so incredibly much. I always tell them that I probably wouldn't have become so committed to sewing if it weren't for my blog and the amazing people who read it and support me. I don't want to take any of this (or you) for granted!

This past year of blogging has been a pretty big one, I think, at least in terms of collaboration and participation. Some highlights:

1) I participated in my first Me-Made-May, which was surprisingly easy (aside from the daily photos) because I've actually built a pretty robust handmade wardrobe. I haven't bought any new clothes off-the-rack since August of 2012! Though I do need more sweaters and am scared of learning to knit them. 

 
2) Made several garments in a short time period for Season 1 of the Project Sewn competition, hosted by the Simon + Co. ladies, and won second place


3) Stood as a judge in the Super Online Sewing Match hosted by Sew Mama Sew. Congrats on your win, Kelli

4) Got Sew Bossy with one of my favorite bloggers, Cirque du Bebe


5) Had Corey's cameraman jacket featured on Jesse Thorn's popular menswear blog, Put This On. Men actually visited my blog! A LOT of men. Hai boyz :-* 


6) Bought a better camera (Canon Rebel). This is a minor change because I don't use it that wisely -- and I'm such a noob at photography -- but this has helped clean up the aesthetic of my blog a bit so I'm happy I made the investment. 

Last year for my first blog anniversary I calculated some stats and posted superlatives on my year of sewing, so I thought I'd do it again to see what's changed. I am a grant writer by profession...and a data nerd... so it's only natural that I want to share some measurable outputs.


Between October 2012 and October 2013, I have sewn 66 garments, 51 of which were for myself and 44 of which have made it to the blog. You're probably thinking "Cool," or "wtf get a lyfe." I had both reactions myself. I love sewing but I also just love wearing new clothes, so sewing quickly is important to me. And we all know I'm not making silk taffeta ball gowns over here. IF ONLY, right.


The distribution of categories is similar to last year, no surprise. I wear dresses and skirts 90% of my life. The only difference, really, is my output of men's clothing. In my first year of sewing/blogging, I made Corey one shirt that never got worn. This past year, I made him three shirts, three pair of shorts, and one jacket. And two Henley tees that weren't counted in the total because I finished them after I made my pie charts. He wears his handmade clothes constantly, so it's win-win. Win: I make him clothes. Win: he does the dishes?


Last year, more than half of my handmade garments were never worn or had been discarded, taken apart, or given away in disgust. This year I still have several duds, but most of those were impulse sews that didn't take much investment of time or materials. My UFOs are a different story I refuse to tell, though. Shudder.

Here are some superlatives for the things I've made in the past year:


MOST WORN: definitely this navy corduroy skirt, made from the Colette Beignet pattern. I wore this constantly last fall and winter. It shrunk in length, but I still sneak-wear it to the office and pretend it's acceptable. I wear my other buttonless Beignets pretty often, too, because I like the shape on me, and they're lined, structured and don't flutter around in the wind.


LEAST WORN: I made this white blazer for round 1 of Project Sewn, and I think it's the sole reason I won that round! Unfortunately the sleeve cap is rotated weird, and the lining is sticky, and I promptly stained it, rendering the whole garment basically unwearable. I'm still holding onto it, though, for the memories or something.


MOST READ BLOG POST: Well, actually my most read blog post continues to be the Round Pintuck Pillow Tutorial (people love pillows!!), but as for posts published in the past year, the review of my Janome coverstitch machine is in close competition with the Cameraman Jacket post. Seems like a lot of people have a coverstitch on their wish list, and it helps that I got a shout-out from Sunni (A Fashionable Stitch) about it. Guys, I'm still so glad I bought one. All my knitwear has awesome stretchy hems! It just feels so pro. So Coverpro, if you will.


FAVORITE FABRIC: I think people think I'm crazy when I wear my flamingo dress, but I can't get enough of it. I won this beauty in a giveaway hosted by Marie (A Stitching Odyssey), so it makes me think of my bloggy friend every time I wear it. It's just the perfect fabric: stretchy with great recovery, lightweight but opaque, slinky but stable enough to cut and sew, cute enough for summer but warm enough when layered for winter. And it's covered in flamingos, c'mon.


BEST BLOG SUPPLEMENT: Instagram. Yeah, yeah, I know. Translation: laziest blog substitute. Blogging is already time-consuming enough, so I've always limited my sewing web presence to my blog and sewing-specific platforms like Burdastyle and Pattern Review. I hate Twitter (too much text, marketing, and di@logue confusion), and Facebook is too littered with high school acquaintances saying boring things. To better connect with sewing bloggers elsewhere, though, I decided to try out the visual platform of Instagram. Turns out I love it, and think it's a great way to share behind-the-scenes sewing stuff as well as other parts of my life with fellow bloggers (though it's still mostly sewing BS with the occasional cute animal). Though it's social media, it feels more personal than blog comments. 

Unfortunately its greatness means that I've been resorting to posting finished projects on Instagram and not bothering to follow up with a blog post. The above photo shows a top I made my friend Charlotte using the Grainline Scout Tee and some fabric I won in Liza Jane's recent fabric giveaway! That may be disappointing to some, but it satisfies my "Look what I made!" impulse without forcing me to commit the hours involved in photo shoots, photo editing, text write-ups and linkies. Still love my blawg, though, and I know a lot of my #1 homies aren't on Instagram (yet). Anyway, follow me if you dare: @foursquarewalls

------------------------------------------------------------------------------------------------------------

Speaking of hours of commitment, this blog post needs to come to a wrap. Thanks again to all of you who read my blog and encourage and challenge my sewing. I wish I could wrap my arms around the whole globe and give you each a squeeze. Until then... cheers!